Looking for simple ideas to add Halloween decor to your house this weekend that is kid-friendly? We have four Halloween crafts that are super simple to make with the kids.
Get the kids involved and have fun during the month of October with all things Halloween.
You can check out our recent segment from Fox 9 Good Day where we shared these ideas.
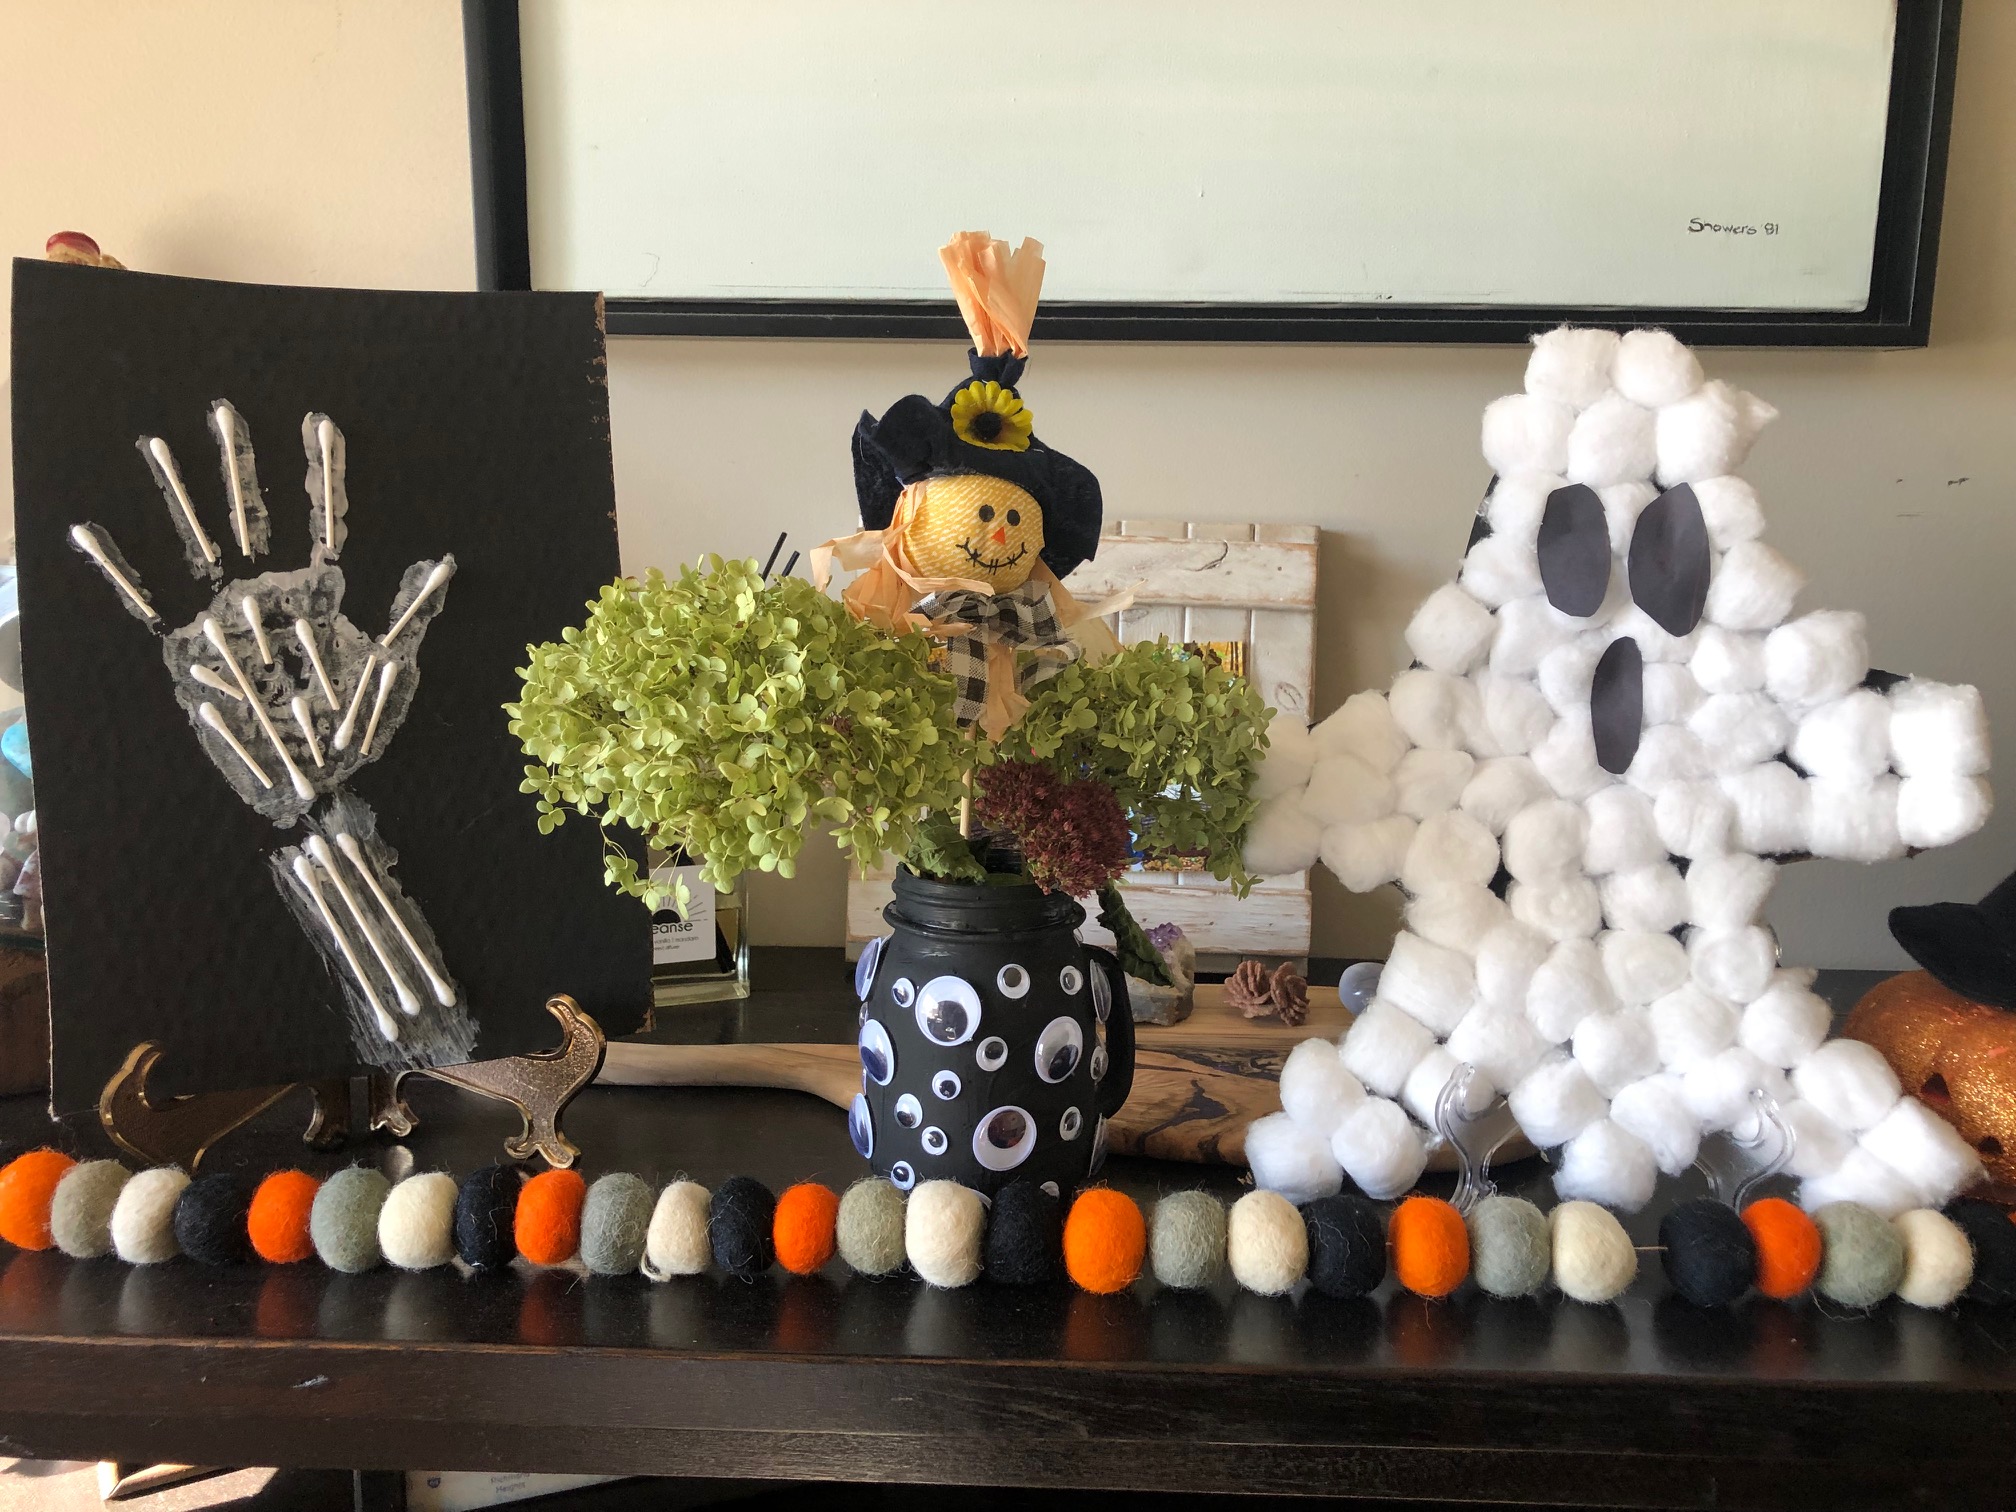
Four Halloween Crafts for Kids:
Cotton Ball Ghosts
Creating a Halloween cotton ball ghost craft is a fun and simple project. Here are step-by-step instructions:
Materials you’ll need:
- Cotton balls
- Cardboard
- White glue or craft glue
- Black construction paper
- String or yarn (optional)
- Scissors
- Pencil
- Black marker
Steps:
- Prepare your workspace: Lay down some newspaper or a plastic tablecloth to protect your work surface from glue.
- Form the ghost shape:
- Draw the shape of your ghost on a piece of cardboard and cut it out.
- Glue the cotton balls onto the cardboard:
- Apply white glue or craft glue to the cotton balls and press them on the cardboard cutout to form the ghost’s body.
- Shape the cotton balls into a rounded, ghostly form.
- Let it dry:
- Allow the glue to dry completely. This might take a few hours, depending on how much glue you used.
- Add eyes:
- While the ghost is drying, cut out two small circles from black construction paper or use googly eyes.
- Once the ghost is dry, glue the eyes onto it to create its face.
- Create a hanger (optional):
- If you want to hang your ghost, cut a piece of string or yarn to your desired length.
- Glue one end of the string to the top of the ghost, creating a loop for hanging.
- Add a mouth (optional):
- Use a black marker to draw a spooky mouth or other facial expressions on your ghost.
- Final touches:
- Allow any additional glue to dry completely.
Your Halloween cotton ball ghost craft is now complete! You can hang it up as a decoration or place it on a tabletop to add a festive touch to your Halloween celebrations.
Halloween Slime
To make Halloween-themed slime, you can follow these steps:
Ingredients you’ll need:
- White school glue
- Liquid starch or saline solution (containing boric acid)
- Water
- Black, orange, or green food coloring
- Optional: Glitter, plastic spiders, or other spooky decorations
Instructions:
- Prepare Your Workspace: Cover your work area with newspaper or a plastic tablecloth to prevent any mess.
- Mix Glue and Water: In a mixing bowl, combine 1 cup of white school glue with 1/2 cup of water. Stir until the mixture is well blended.
- Add Food Coloring: To create a Halloween color, add black, orange, or green food coloring to the glue mixture. Start with a few drops and mix well. Add more color if needed to achieve the desired shade.
- Optional: Add Glitter or Decorations: If you want your slime to be extra festive, you can add glitter or small plastic spiders to the mixture. Stir them in evenly.
- Activate with Liquid Starch or Saline Solution: Slowly add either liquid starch or a saline solution (containing boric acid) to the glue mixture while stirring continuously. Add it a little at a time until the slime begins to form and pull away from the sides of the bowl.
- Knead and Stretch: Once the slime starts to come together, knead it with your hands. If it’s too sticky, add a bit more liquid starch or saline solution. If it’s too stiff, you can add a touch of water.
- Store in an Airtight Container: After you’ve achieved the desired slime consistency, store it in an airtight container or a resealable plastic bag to keep it fresh for play.
Remember to supervise children when making and playing with slime, especially if they are very young, as some ingredients can be harmful if ingested or come into contact with eyes. Have fun making your Halloween-themed slime!
Goggle Eyes Vase
Creating a goggly-eyed vase can be a fun and creative DIY project. Here are the basic steps to make one:
Materials you’ll need:
- A plain vase (I used a Ball canning glass)
- Googly eyes of various sizes
- Strong adhesive (e.g., hot glue gun or epoxy)
- Optional: Paints and brushes for decorating the vase
Steps:
- Clean the Glass: Start with a clean, dry vase to ensure that the adhesive will adhere properly.
- Paint or Decorate: If you want to add more personality to your goggly-eyed vase, you can paint the vase in fun colors or add additional decorations. Wait for the paint to dry.
- Arrange Googly Eyes: Lay out your assortment of googly eyes in different sizes and positions to plan the design. You can create a pattern or go for a more random look.
- Glue on the Googly Eyes: Use a strong adhesive like a hot glue gun or epoxy to attach the googly eyes to the vase. Apply a small amount of adhesive to the back of each eye and press it onto the vase. Be careful not to use too much glue to avoid messy drips.
- Allow to Dry: Let the adhesive dry completely according to the manufacturer’s instructions. This usually takes a few hours
- Display: Once everything is dry and secure, display your goggly-eyed vase in your desired location. It can make for a quirky and eye-catching piece of decor! I added hydrangeas from my garden!
Remember to handle adhesive carefully and consider safety precautions, especially when using a hot glue gun. Enjoy your creative project!
Handprint and Q-tip bones
Creating a handprint of bones using Q-tips for Halloween is a fun and spooky craft project. Here’s a step-by-step guide:
Materials you’ll need:
- Cardboard (cut to 8 x 10)
- Black paint
- Q-tips
- Paintbrush
- Water and a palette or plate
- Optional: a handprint stencil or an extra pair of hands to help
Steps:
- Prepare your workspace by laying down newspaper or a disposable tablecloth to protect the surface from paint.
- Pour some black paint onto your piece of cardboard and paint it black, allow the paint to dry.
- Paint your hand and arm with white paint. Press onto the cardboard to create a handprint. Make sure your fingers are spread apart to resemble the bones of a hand.
- Glue the Q-tips to add bone shapes along the fingers and handprint. For the fingers, create elongated oval shapes for the bones. For the hand, make larger oval shapes or rectangles for the wrist and hand bones. You can refer to a reference image of hand bones if needed.
- Allow the paint and glue to dry completely. This may take some time, so be patient.
- Once the paint is dry, you can further enhance your bone handprint by adding details like joints and shading with a fine paintbrush and black paint.
- If you’d like, you can add a spooky background or other Halloween-themed elements to your artwork.
- Let the entire artwork dry thoroughly before displaying it for your Halloween decorations.
Remember to take precautions when working with paint, and use non-toxic paint suitable for crafting. This handprint of bones using Q-tips can be a great addition to your Halloween decor or a fun activity to do with kids.
Related Link: Click here to find more arts and craft ideas to make with your kids!